Showing posts with label For Her. Show all posts

Saturday, August 13, 2011

Family Visits...the fun and the sad!!!

Hi there scrapping peeps,

We were surprised this weekend by a visit from our daughter and her family. What a fun thing!!!
Instead of just doing normal everyday stuff, we get to spend it with kids and pets, and a couple of adults too. And then we get to do fun stuff, like stay up til the wee hours of the morning watching movies. That's the good part.

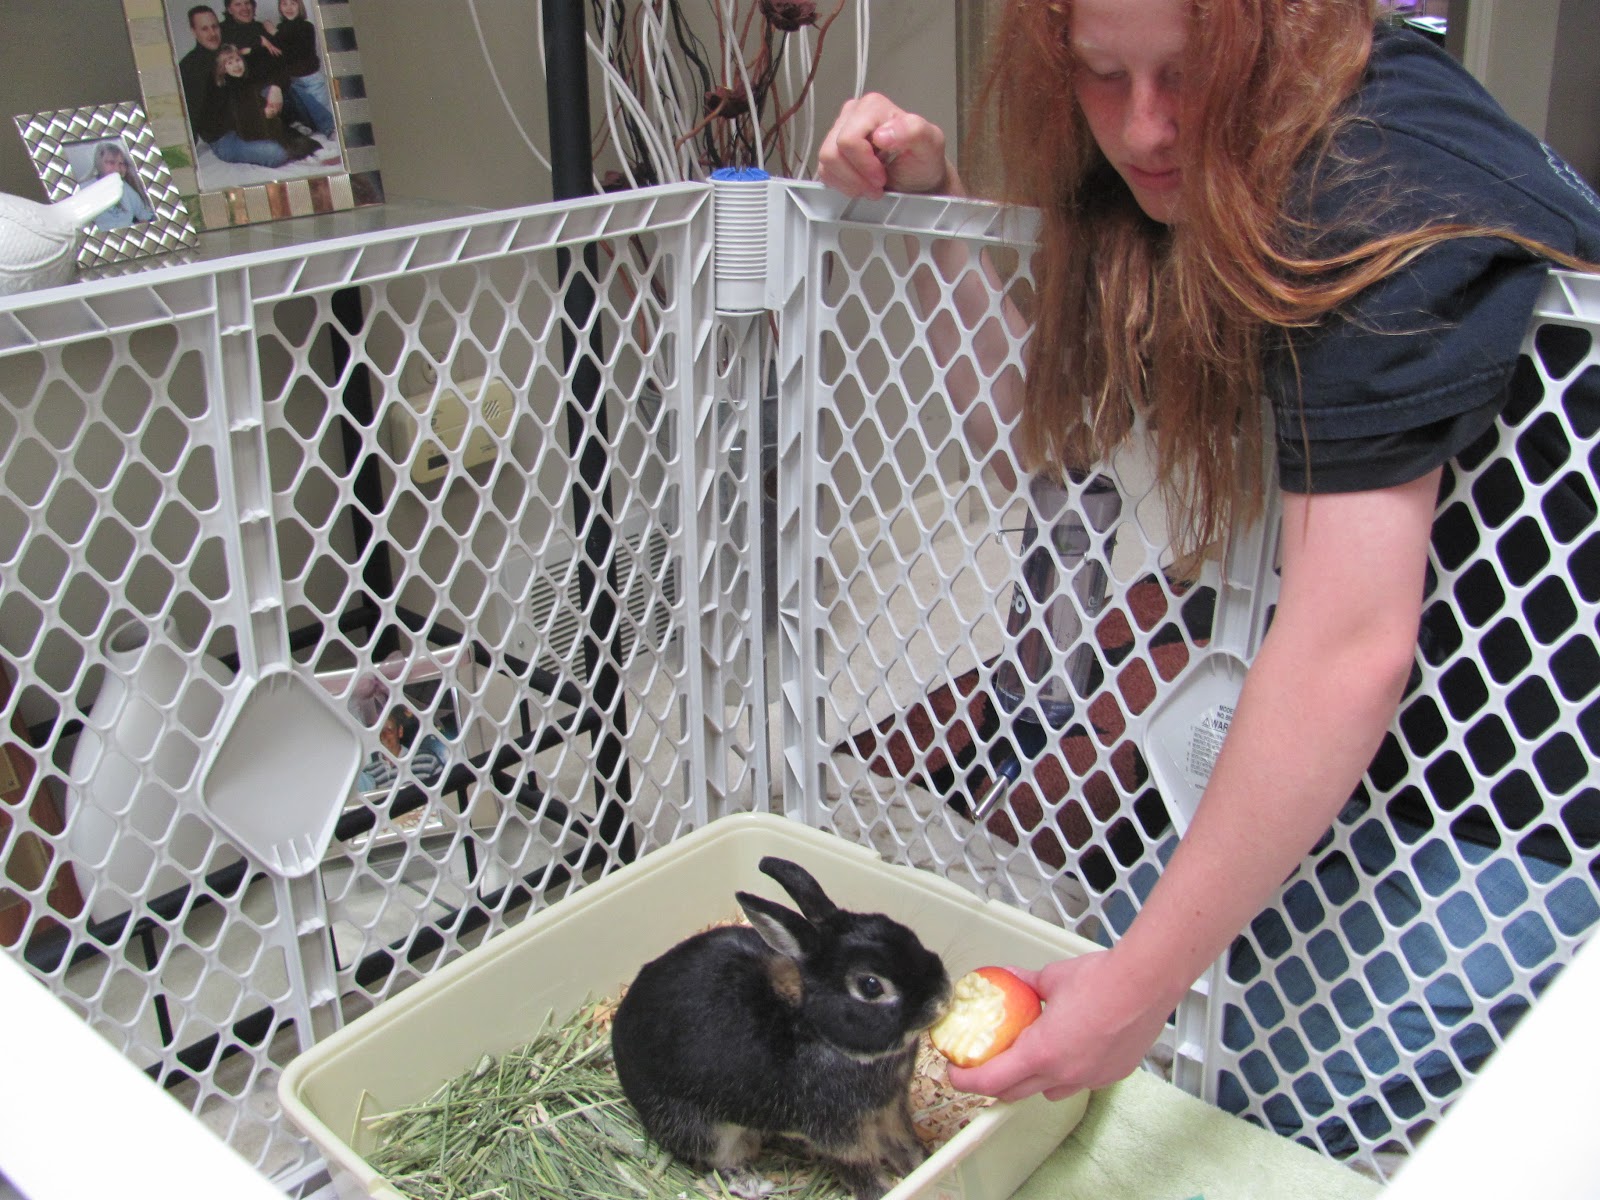
But we also had a not so fun thing happen during the night. Our granddaughter's bunny died. She had him and loved him since 2005 and didn't go anywhere without him..."love me, love my Nemo!"  Kirstin (our granddaughter is 15 and a natural caregiver. Nemo was her best friend, lived in her bedroom and they spent many hours together. Another life lesson...living with the good and the sad...

But that's life and we KNOW that there's many happy days to come. She has family that loves her, cares for her and helps her through the sad times. Love you, Kirstin. God bless you for many happy days and adventures to come.

Goodby Nemo!!!

I do have a card for today.
I made this for a couple of challenges.


Stamp TV's Monday challenge is an inspiration picture and I fell in love with the mirror frame on it. The colors to use are mustard, blue and deep red. So that's what I started with.

http://www.polkadotdoordesign.blogspot.com/ has an inspiration challenge with the same colors and I LOVE their challenge site. Not only can you win the weekly sponsor prize, but you might also be invited to be a guest designer.
http://stampinsistersinchrist.blogspot.com/ They wanted us to use an item we had purchased that we just had to have, but it's been hanging around in our stash. See the heart on this card? I bought a packet of these beautiful hearts a long time ago...but guess what? they just never seemed to fit into anything I was doing. So, I'm very happy to have found a place for one of them.
http://www.simonsaysstampandshow.blogspot.com/ This challenge required us to use a Tim Holtz technique. My background is colored and then stamped over with a mesh background stamp. The dark red on the right side is a piece of long stranded fiber with a heart attached by ribbon and a butterfly nestled in the strands.

So, that's it for today.
Be blessed today and every day,
e

Tuesday, August 9, 2011

Tired, but happy....

Hello scrappers,

This is Tuesday and the start to my work week. I work part time and you would think I would have TONS of time to do all the crafting I desire....NOT SO...there's always a ton of other responsibilities and I am either too busy or too tired, or tooooooo...whatever!
BUT it feels good to be busy and look back on a day that feels satisfying and full. We all want more time...but I don't know, I am so tired by the end of the day I don't think I could take longer days.

I made this card for two challenges in particular:
http://theplaydatecafe.blogspot.com/ required colors watermelon, sorbet and lime green and
http://marksfinestpapers.blogspot.com/2011/05/speedy-cats-friends-challenge-54winner.html required "not a normal card" (no squares or normal rectangles).

The cut front piece was cut with my Cricut. The word "Hope" was also cut with the Cricut.
The flowers on the front were made with a Penny Black stamp, colored with DerWent new water color pencils. and then topped off with a very soft, light pink tube of Stickles.
This was my first time using the DerWent pencils. I used a coupon at Hobby Lobby and that made the set much more affordable. They are WONDERFUL!!! Very bright, and just a tiny amount of water on the tip of the pencil just puts the color down gloriously!!! It was VERY FUN!!!

That's all for me for this time.
Enjoy the wonderful summer weather and
Be Blessed,
e

Tuesday, July 5, 2011

It's JULY already!!!

I know I speak for most of us...where has June gone???
We are having a wonderfully BLESSED summer with family this year!
Our granddaughter came to be with us (she is 15!) We had such a great time!!!
Here she is with her bunny (Nemo)...can't leave home without him.
Then the rest of Kirstin's family came and we have a FULL HOUSE!!! (Fun, noisy, never boring, busy house). I LOVE IT!!! I hate it when they leave, our house gets so quiet!!!

Here is a picture of their youngest son (Eli, 6) petting a horse at the July 4th celebration.
Those police officers were so friendly, it was great for the kids to get such a wonderful impression of them.


Anyway, today I have a new card for you. A bit of a different take because I am trying out a new idea (for me anyway) of having a minimal card with many layers. I really like the look.. it speaks to me on a personal level because I used elements that I really loved. I am not giving this one away because the dangling shell is one I have enjoyed for a long time and don't want to really part with it.

The card base is an off-white cardstock, covered on top with a designer paper I had in my stash.
The embellishment paper is a design I made with alcohol inks on shiny cardstock. I make several pieces and then use them to cut into designs or use like I have here.
The half circle is a Heidi Swapp rub-on, cut in half.
The shell ornament is hanging on a metal loop hanger attached with a large pearl brad.
I wrote "Life is...." by hand and attached a little gold and tan butterfly that I cut out of a Mariposa 8x8 stack.

I am entering this card here http://ourcreativecorner6.blogspot.com/2011/06/your-style-and-design-team-call.html for a DT call.

I really like the look, hope you do too.
It feels "artsy" to me and that's what I was going for this time.

Thank you so much for looking,
Come back soon,
e

Tuesday, May 31, 2011

The Ideas are just flowing or.........

is it just because I am so behind????
It doesn't matter, because I am creating and LOVING EVERY MINUTE OF IT!!!
It's so much fun when ideas just ramble through my head and I can't wait to start on the next card or LO.

So, here I am with the card I created for the Stamp Man Challenge and the Simon Says Challenge.
I needed a card for my son-in-laws Birthday and these two challenges were just the ticket.

Here's my card:
http://simonsaysstampschallenge.blogspot.com/Challenge was to use stars and stripes.
http://thestampmanchallenges.blogspot.com/Challenge was a recipe and I chose blue, torn and a die cut.

So here's the deets:
I distressed the background blue striped paper and pulled back the corner to show some stars from a     sheet I inserted behind the stripe.
For the flourishes on the stripe, I used several stamps and stamped them in Versamark, then embossed in white. It's quite subtle but that's the look I was after.
The die cut on the bottom is the Tim Holtz on the edge cut. I just got it and I LOVE it!!!
The frame is a stamp I just discovered in my stash and I don't think I had ever used it before. I don't even know when I got it. But I love it...it fits perfectly with all the frames that are being used now.

So there you are...my little piece of art in my little corner of the world.
And oh, by the way...remember when I said I would do something new every time I made something?
I have not forgotten...and even though some of the items were pretty small and I had not brought attention to them, I HAVE been doing them.
In this card that torn corner was my first time doing that...and then going through my stash and finding a stamp I had not used was a part of making sure I do something new EVERY TIME!!!

Thank you for stopping by....
Be extremely blessed TODAY!!!

e

Monday, May 30, 2011

It's a beautiful Memorial Day!!!

First of all, I want to thank every person who is connected with the US Armed Forces. Especially those who are on active duty. Our thanks is not enough, I know, but it is from the heart. I pray God's mightiest blessings over you. That our God will keep you SAFE...physically and mentally. May God send His angels to build a hedge of protection around ALL of our service men and women. And may you know His GRACE!!!!

Our son-in-law is in the Navy and I know from personal experience that it is a very difficult time for the families of these men and women. The dedication of the families are a gift of love to this country also. It is not an easy life. But thanks be to God for them all.

At this time, our hearts also go out to all the families suffering loss from the tornadoes that have devastated our land. It is a huge tragedy that will affect so many for years to come. We pray that God's grace and love will be made visible through all those who have stepped forward to help in this time of need.

Now, on to my card for this Monday.
I am grateful for all the challenge blogs that are available on line. It makes it fun to share our creations with others and be inspired by their DT teams. I don't know who started the ball rolling, but my hat is off to the one who was inspired to take a chance and start something new. We are all grateful participants.

Two of my favorite challenges are the Play Date Cafe and the Top Tip challenge.
The Play Date is saying goodbye to one of their co-founders and they chose the colors black/white and green because that was Sarah's favorite combo. The the Top Tip it was to use 2 or more stamps. So these two challenges went together really easily. I made this card to enter:
I love black and white, but green is not my favorite color. But it works with any kind of foliage so that's what I chose. Maybe I should have colored that little bird a different color, but I didn't want to introduce something else to the mix. Isn't he the cutest though? He came in a stamp set a long time ago, I don't even know what company made it. But he has been a favorite whenever I need a little bird for something. He just has the cutest little look. I don't know if you can tell, but his little belly is small flourishes. I LOVE it!!!

On to the deets:
My frame is from a huge 12x12 pad of paper that was all black/white and silver. I have used tons of it.
The card itself is black and I use a white insert so that I can write on the inside.
I cut the black/white to leave a little 1/8 inch edge around and then cut the inside out to make it a frame
Four thin pieces of black are used to finish off the edges.
The filler in the middle is from a white Hallmark card my husband gave me that has beautiful dotted swirls on it (like from a cuttlebug) and it is just stunning.
The cut tag is the back side from the one used on the Hallmark card. I used 3 different small foliage stamps to make the foliage in different shades of green and then stamped the little bird.
The black swirls and hearts are from K&amp Company. They are just gorgeous and are called "Pillow Stickers"
A little bow from black see-through ribbon finishes the look.

http://theplaydatecafe.blogspot.com/
http://toptiptuesday.blogspot.com/
My TIP for the Top Tip blog is to save the cards and advertisements you receive. There are many beautiful papers, inspiration, or colors that can be used in your art. Look at your cards & such with a critical eye. Sometimes cutting out small images from a beautifully colored piece of paper can be stunning. Hearts, butterflies, stars can be just gorgeous and you don't need a large piece to cut those.

Thank you for looking.
Have a wonderful, fun filled day!

Friday, May 27, 2011

A quick post...

I am having to hurry up and get this blog rolling so that I can enter this card into the http://stampinsistersinchrist.blogspot.com/ challenge blog. I forgot that this is Friday already and I made this card just for the two challenges that I am entering this card into. The other one is http://letsinkitup.blogspot.com/2011/05/challenge-15.html

When I saw those two posts, my thoughts just clicked and I knew exactly what I wanted to do. I've been cleaning up my craft room AGAIN...still moving things around because I have added supplies and am having to reorganize my space. I love to organize and I like things very near me so that I don't have to hunt around when I need a particular item.

Anyway, I am very blessed to be able to shop around and buy new dies, etc. every now and then so that I feel like I have something new to work with. I always seem to be seeing something that I just "want"!!!

Anyway, here's my card:
The color of the card is actually red and so is the flower, but somehow I just couldn't get the color to come through. This is much more simple than I usually do, but I just really felt like this is all it needed.  Sometimes you just don't need much more.

Here's the deets:
The background paper is "Mariposa"
There's three different flowers put together.  They're from my stash.
The silver border around the sentiment is something I picked up a long time ago. They came in a pack and I have used these sparingly because I love them so much.

http://stampinsistersinchrist.blogspot.com/ challenge is to make a card with an uplifting sentiment and something silver.
http://letsinkitup.blogspot.com/2011/05/challenge-15.html This challenge is to make a card with a sentiment and a 3D flower.

Hope you enjoy seeing my creation.
Please leave me a note...we all LOVE comments.

ttfn
e

Monday, May 16, 2011

Hello Everybody!!!

It's been quite a while and much has happened in our family life.
We had a grandson graduate from Michigan Tech and that has been so exciting for our family. He is a remarkable young man: loves the Lord (absolutely the best part), graduated in 3 years, is only 19yrs old, his Bachelor's is in Chemical Engineering, AND he is going on to Massachusets Technological Institute (MIT) to earn his PhD. The school gave him a full scholarship plus a salary for living costs. GOD HAS BLESSED!!!

It made me  realize that there are a lot of wonderful, dedicated young people out there, we just don't hear about them very often.

I also have a lot of cards and lo's to show so I will start with this flower card. Hero Arts challenge for May is flowers and I decided to do these flowers from their "Thanks" collection. I stamped the flowers twice and layered them for a 3D look.
I made this card for a friend's Birthday.
The flowers are stamped twice and layered.
They are colored with colored pencils then added stickles for the center for sparkle.
The corner is cut with my Cricut, Storybook cartridge.

I have also entered this into the http://movingalongwiththetimes.blogspot.com/
They are doing the "two B's" challenge. Two things on the card that start with "B".
In this card we have "Best" friends and "bling" There are purple square rhinestones and lots of sparkles on the center of the flowers. PLUS the purple background circle has sparkle on the design (I know it's not visible...sorry).

That's it for today.
Eat lunch and then take my phone in....it's not working AGAIN!!! UGH!!!

ttfn
e

Wednesday, April 20, 2011

I love embossing....

Hello again,

I am home from work today and thought it was a wonderful time to catch up with my blog because there were several challenges I wanted to enter.
I made this card for a friend, with these challenges in mind. So here's my info and my card:

The challenge is embossing on http://thestampmanchallenges.blogspot.com/
and for http://samueltaylors.blogspot.com/ the challenge is distressing.
At http://papersundaes.blogspot.com/ they have a challenge to include texture.
The http://tuesdaytaggers.blogspot.com/ challenge is to use something recycled.
I love these sites...go take a look, see if you like them too.

Here's my card:
I don't know why the background took on that pink cast. This is the first time that has happened...I'm going to move the place where I photograph...and, now that I think about it, this is the first time I have used a white paper under the card.

Now that the apology is over, I will tell you about the card. I really enjoyed making it.
The butterfly and the flourish are embossed with UTEE and clear glitter powder on the butterfly.
The flower and  the edges of the card are Distressed  The flower is also sponged with distress inks and edged with turquiose Stickles.
Lots of texture here with the lace, glitter, embossing and a flower made with several layers.
Recycled items are the lace, which is from a wedding a long time ago and the flower is made from leftover paper from another project.

The flourish is a die from Sizzix, I bought it a couple of years ago.
The flower is cut with the Tim Holtz flowers die. I really like that die, it makes perfect flowers for almost any project.

Thank you so much for stopping by.
Please leave me a comment and let me know you were here.

Blessings,
e

Tuesday, March 22, 2011

Butterflies mean spring!!!!

We are having cold weather right now...but I am NOT complaining. I KNOW THAT SPRING IS JUST AROUND THE CORNER!!! It's already in my heart, and I will see it outdoors soon!!!
Michigan takes a long time to get around to being warm. We get teased with a few sunny days and then back to the cold and grey skies...but when it comes, it's AWESOME!!!

All our kids live out of state and we still have three Birthdays to celebrate...so the next month will be filled with long rides and family fun. I LOVE travel of any kind and being with family on top of that, it's like icing on a cake!!! CAN'T WAIT!!!

I've been working like crazy around here! Had lots of Birthdays to make cards for and then have to do taxes on top of that...AND I still have some winter decorations up. Christmas is such a short season and I really enjoy some of the wintry stuff, so I leave it up for a while...BUT IT'S TIME to get SPRING in here.

So anyway, here is one of the cards I made.

 
My inspiration came from Brenda of "Infinite Possibilities". She had a very cute card. All white with a cut-out that she filled with flowers. I just loved it...and came up with this card. Check out her blog, you'll like her stuff.

The deets on my card: White cardstock stamped with Hero Arts "leaves" in black StazOn.
The opening is cut with Spellbinders rectangle (ragged edge).
I cut a piece of designer paper to fit the rectangle and glued it to the back of the opening.
I scribbled three times around the hole and then attached rhinestones to the edge.
All the edges of the white cardstock was roughed up with my scissors...that works better for me than using the tools made for that purpose.

Time to tell you that I am entering this card in thia challenge:
http://samueltaylors.blogspot.com/

God bless you,
ttfn

Monday, March 14, 2011

Orange, Blue and Pink....hmmmmmm

Orange, blue and pink are the colors for this week's challenge on the PLAY DATE CAFE blog.
I saw those colors and I KNEW I had to try a card. What a combination!!! .I knew it would work because ALL colors work in different shades and different amounts... but I just really wanted to try it!!!
How fun!!!

So here's what I came up with. The heart, which is really the center of the orange/pink combo was a piece I had done while playing around with embossing powder and Pearl Ex thinned out with water. It turned out to be totally the right colors. YAY!!!

 That little strip under the double circle Martha Stewart punch is little beads. Doesn't that add a nice happy touch to the card? I love it. I haven't used beads for quite a while. I'm glad I tried it there. I really like it.

http://theplaydatecafe.blogspot.com/
I am also entering it in the Hero Arts Challenge for Birthdays.
I love their blog too. Check it out.
http://heroarts.com/blogs/club/march-2011-contest-details/

Thanks for stopping by.
e

Sunday, March 13, 2011

A Birthday Card!

Here is a Birthday card I made for my boss...I'm a little late with giving it to him, but that's been my life lately...the ideas are there and I can't wait to get in there and start putting it together, but it seems that stuff just keeps coming up and keeping me from what I REALLY love to do...
I wish I had made the words a bit smaller...they look too big to me now, even though it didn't seem that way when I was putting them together.

The paper is from the Mariposa pack by DCWV...I love that pack.
The bird, butterfly and birdcage are cuts from that paper. Isn't that birdcage the prettiest ever? All the little wires on it are gold glittery. You can't see it here but it is very lovely (and I don't use that word often!!!)
The words are cut with my Cricket. I still find that a very useful tool in my craft room. I've had it for almost as long as I've been crafting (almost 6 yrs now). I couldn't work without the Cricket, dies that can be cut with my Cuttlebug and punches. These tools make most of my embellishments.
Last but not least is the heart at the top. I am disappointed that it doesn't show up too well in the photo. I cut it from grungeboard. embossed it 4 times with a turquiose powder and then painted with different colors of Pearl Ex. I made a bunch of these embellies in different shapes and I love most of them. I don't go for grunge that's too weird but that look of being artsy and kind of out of the ordinary is my "thing".

So, here's the two challenges I am going to enter this card into:
http://toptiptuesday.blogspot.com/
http://abc-challenge.blogspot.com/
http://www.simonsaysstampschallenge.blogspot.com/

Thanks for stopping by.
ttfn

Tuesday, January 11, 2011

A bird in winter....

Here is a card I made for the challenge over on "Our Creative Corner". I fell in love with their inspiration picture...a chickadee in winter on a bush with red berries... Can't think of anything lovelier than that. I LOVE,
LOVE, LOVE birds...bird pictures, live birds, watching birds... all a favorite pasttime of mine. and I love rich, vibrant colors, like the red berries. So I just had to make a card for the occasion.

I have made a commitment to myself for this year...every card I make will have a new technique or feature that I had not done before. On this card, I cut the frame out into two parts, and then put a thin piece of black cardstock on to my background picture to look like a double frame. It took a lot longer than just matting once or twice, but I like the effect.

The background branches and berries are a Penny Black stamp I bought a while ago but haven't used it much. It's a beautiful stamp, I need to drag it out more often. I stamped on watercolor paper, I'm not sure I like the effect all that much. I'll have to do a card on my regular cardstock and see how that turns out. The branches on the watercolor paper kind of mottled together and I'll have to see how they look without the watercolor effect.

The bird is a punch from Stampin'Up!  I have used that punch over and over. It just works. I cut it out on a swirly red patterned paper, then double backed it with black cardstock so that I would have a black edge on top and bottom. I inked over the paper with a deeper red and then covered it with PPA glaze. The glaze made the bird...it just looks thick and rich and shiny. The branches under the bird are on the bird punch, and they always seem to add just the right touch.

Challenge entered: http://ourcreativecorner6.blogspot.com/

Well, thanks for visiting my blog.
Please leave me a comment....I LOVE comments.

ttfn
e

Saturday, January 8, 2011

Brrrrrrrr...it's cold outside!!!!!!

Hey everybody....January is here, in full blast...Snow and cold in most of the country, including Michigan!!! I am a sun and beach kind of a girl....so what am I doing in Michigan you ask....I DON'T KNOW!!!!!!!!!!!!!

Well, on to card talk... I was so excited to get back into my craft room after the busy holidays. I loved every moment of family, friends, church and other activities... but I really missed seeing the ideas that roll around in my head come to life on my crafting table.  We all need that release. That fulfillment of creativity going from an idea to a real thing you can look at and touch. Not that it all comes out as beautiful or as perfect as it does in our imagination, but what we do end up with is wonderful and our own creation. That's the best part... knowing your heart is in the project you just created. So, we share it with our friends and hope that it gives them pleasure knowing that we are sharing ourselves with them.

Here is a thank you card I made. I really like the clean colors and the large white pearls.
 I bought my first gold resist pen for this and I really love it! Very easy to use too. I edged all the layers with the gold resist, using a ruler to keep the edge even.

The rosette is new to me. I don't like them all that much but I wanted to try my hand at it so that I would at least know how to make them. Pretty simple. This one is much fuller than it needs to be. I cut two 12" strips. It did make it kind of hard to handle. The strips were 1 1/2" wide. Since then I have used just one 12" strip and 1 1/4 - 1 1/2" wide. That seems to be just about right. I scored the rosette every 1/4". I like that because that keeps the rosette pretty small in height. I used a lot of strong glue to keep the rosette together. Wouldn't want it to unravel in a few weeks.

I have entered this card in these challenges:
http://www.flourishes.org/category/challenges/timeless-tuesday/
http://ourdailybreaddesignsblog.blogspot.com/


Well, that's it for me.
Keep warm and be blessed.
Love on someone today.
ttfn,
e


Monday, January 3, 2011

A NEW YEAR!!!

Hello to everyone who read this
I want to wish you a very BLESSED and WONDERFUL 2011!!!
May it be the best year of your life!!!

To start the year we had a wonderful church service.... GREAT sermon to start the new year.
We were challenged to fast for 21 days to focus on our relationship with God and seeking His will for our lives. AWESOME!!!

Want to share a winter card with you:
Our need for Birthday cards never stops so I actually make many more Birthday cards than I do Holiday cards. Here is a card I made for a December Birthday.
I love the colors on this card. The background is a shimmery white with a subtle swirley design. Silver ribbon, silver pearls, silver hearts. The snowflake was cut with my Cricut and embossed with Kaleidescope shimmer. I LOVE that embossing powder. The card, of course, is the same cardstock as the snowflake.
I hope you like this card as much as I do.... I think it's one of my favorites.

I have entered this card into the following challenges:


Thank you for visiting my blog.
Blessings,
e

Monday, October 18, 2010

Look at my new Watermark!!!

Hey everybody, Monday morning, beautiful outside, a day off work....doesn't get much better than that!!! I've got a long list of stuff to do, but that's fun too...wouldn't want to be bored or without a hundred projects that need attention!!! THAT'S LIFE!!! God wants us to be productive, and the most important question we have to answer EVERY DAY is "am I being loving to the people around me as I go about getting my work done?"

My biggest problem as I answer the question above is that I am constantly late in getting my cards to the people I want to bless. I get side-tracked, forget the card or the envelope, am late in getting cards done, etc. etc. etc. My focus right now is to break this and get my cards out on time.


That's why I've been making four at a time...to get some extras in my stash. Here's the next two I have from the inchies set:

Don't they look totally different? I LOVE IT!!!  I started the Pooh one with the inchies and the trees... then got really stuck as to what to do with the rest. There was a challenge that I saw (My favorite things) that asked for a fave character and I knew then exactly what I wanted. I know I'm old now, but I have loved Pooh from when it first came out and my kids were really into it. His little sayings and the deep, heartfelt friendship between them all still touches my heart.

You know what that really cute background for the trees is??? a giftcard holder that I saved because I KNEW I could use it sometime down the road. Pooh is a copy out of a kids' book.  The leaves are stamped and cut out of an advertisement for a stamp store. I really LOVE using advertisements, magazines, whatever catches my eye, because when you cut designs out of them, they are so unique and interesting.

The second card is my favorite I think. I used distressed inks to color paper to different shades of orange, red and pink. Then I stamped on the pieces with little stamps. Here again, I cut some clear stamps apart to get words or images for what I need right then. I store the pieces together so that the original image is not lost.  The black flourishes on each side are actually the ends of a tag I bought at Hobby Lobby from Sizzix. It is made for Hobby Lobby, so you probably have to purchase it there.

Here's the challenges for these cards:
http://crazy4challenges.blogspot.com/2010/10/crazy4challenges-c4c59.html

Well, that's it for me for today. On to paint my bedroom wall.
ttfn
e

Saturday, September 25, 2010

Ribbon Flowers

Hello everyone,
Been a while since I have had a chance to get to my blogging (or cardmaking for that matter).... Lots of family stuff and work related priorities. I am so behind in getting cards out to people who have had Birthdays that I feel totally embarrassed.
I had to call my friend today and beg her forgiveness for not getting her card out in time. Her Birthday was on the 14th of September!!!!  But, my cards are almost done and I will be mailing out Monday, so then I can get back on track.

I really like to send personal cards to my family and friends and never have enough extras so I can just grab something that has already been made. I was very happy making each card individual and not a repeat, but it is just too hard. I have now decided to make four cards every time I make a card...it saves tons of time and it will give me some extras in my stash. I will still put different embellishments on each card and make each a little different from the other, but the basic card will be the same.

So here's the first card.....
The two flowers are made of a beautiful white ribbon that I colored with Tim Holtz' Distressed Ink Pad called "Spiced Marmalade". It colored so beautifully, I was totally impressed. I am really loving orange this year and this turned out just beautiful! I LOVE it!

I just made a running stitch on the bottom of the ribbon with plain needle and thread and gathered the bottom together as tightly as I could. Used a longer piece for the larger flower and small piece for the smaller one. I secured the flowers with silver shimmery brads and then folded the flowers until I was satisfied with the look. I secured the folds underneath with glue dots. I used small pearls for the flourishes.

Here is the other card, same base, different flower:
Soooo, that's my offerings for this time.
Do you have tips on how to have cards on hand so that I don't have to work in panic mode??????
Leave me a comment and let me know how you do things....

Thanks for visiting,
ttfn
e

Wednesday, August 25, 2010

A card in blue


Hi all you stampers in cyberland. It is Wednesday and it was beautiful today here in Michigan.
I had to work though, so I didn't get to see too much of it.
I needed a sympathy card, so I tried to keep it simple yet attractive. I also love this verse and I wanted to use it here. This verse reminds me that God takes care of my every need and never forgets that I AM HIS!!!
That's what I want to convey to the  family I am sending this to. God holds them in His loving arms and cares about their pain.

The background is Cuttlebug Dotted Swiss. The two  panels are stamped with a wheat stamp in silver ink. Then overstamped with an iris stamp in medium blue. To get that light look, I stamped off on scrap paper, then stamped the panels.  I didn't want the stamping to stand out too much and it shows off a bit more in real life. It's pretty light here in the picture. The silver ink  took on almost a gold look, but when you move the card around, it is definitely silver.

The double circle bottom cut is a Martha Stewart edge punch.
The small butterflies are also Martha Stewart. Bottom layer is the blue of the mats and the top is cut out of scraps from the stamped panels.
Some very small gold bling added too. I can't do a card without some glitz!!!

Challenges entered for this card:

ttfn: e

Saturday, August 21, 2010

I can't believe it's been two weeks!!!!!!!

I am SO SORRY!!!! We've been working on re-doing our bedroom and time just totally got away from me. I am kind of an "in the moment person" and I get totally involved in what I am working on. And right now, decorating the walls in our newly painted bedroom is just fun! fun! fun! I LOVE IT!!! I went shopping today with a friend for all the little decorating stuff that is so fun to buy and I was amazed at how much scrapbooking has become part of the whole decorating scene. There are flourishes, cute phrases, art for walls, words for walls, etc. etc. etc. Everything I looked at, all I could say was "I can DO that!!!!" Of course, the thing is, it would take forever to do it all yourself.


I have a card  that I want to share with you. The background stamp is "Amazing Grace". I just love it!!! I found it at a scrapbooking show in Novi, Michigan (near Detroit). I went there with a friend. Didn't have a whole lot of money to spend so I was being very careful with my purchases. But, when I saw this stamp, I just had to have it. I'm sure I will use it a lot!!!

I made this for Gina K Tuesday Sketch Challenge. I had already started this card because I love inchies and the next day her challenge came up and it was EXACTLY what I was making!!!  How often does that happen????

Card details: First I stamped the Amazing Grace stamp on white, lightly glittered, shiny, heavy cardstock I had bought for Christmas. I stamped in Versamark and embossed in white.
Then I used Distressed inkpads of spiced marmalade, worn lipstick and fired brick. Just kept working it until I liked it. I also used black to get dark spots so it looked splotchy and made all four sides darker.

The inchies were colored with the same colors, and then I wrote "Amazing Grace...how sweet the sound" in my handwriting. I don't have great handwriting, but I like the look of it being handwritten.
Then I sprayed a pearl mist on them. I make my own mist by following Tim Holtz directions for Perfect Pearls Mist.
So the three inchies have a sparkly finish and stand out from the background.
I blackened the edges of the inchies and matted them in white.
The flourish is a Tim Holtz Sizzix die-cut and the flower is made from coffee filters.
If you would like directions for the coffee filter flowers...please leave me a comment and I can email you back. I love to share techniques.

Thank you so much for looking.
Hope you enjoy....I really like the way this card turned out.
I don't know if pictures ever do a card justice, but I guess we're pretty used to seeing pics and imagining the real thing.

Be blessed,
e

Sunday, August 8, 2010

Gina K Color Challenge

Hello everyone....
Another hot day here...and I am NOT complaining because I love summer...but sometimes a little breather is nice!

I loved this color challenge from Gina K, using red, orange and yellow.  Can you say SUMMER????
But I also had this black and white background that I REALLY wanted to do because I LOVE the paper. Soooooo, I decided to combine. I LOVE the brightness of the flowers and the bird, AND still had that beautiful black and white elegant background.
Hope you like it.

The card: Flowers are from a stamp I have had for a long time. I watercolored them with the beautiful H2O's I bought a couple of years ago. They shimmer and shine so beautifully. Then the bird is a Stampin' Up! punch...with a little glitter of course. I just don't think I can call a card done unless it has some glitter, ribbon, or other glitz on it....

So, there's my entry.
Hope you enjoyed looking.
Have a WONDERFUL & BLESSED week.

ttfn
e

Wednesday, August 4, 2010

A few more challenges

Here's a card I made for a friend in the hospital. It was one of those that kind of evolved. Things just didn't work the way I thought they would, but then in the end it kind of came together. I find it difficult when my plans for a card just don't mesh and I'm left trying to find what would work.

The paper is a favorite piece that I bought several of....but now I have lost my vision for it.
The white punch is Martha  Stewart and the brown frame is Spellbinders. I then wanted an olive green large flourish and covered a Tim Holtz grungeboard flourish with a green polka dot paper. That didn't look good at all so I embossed with clear and then with Kaleidescope. Never did become what I wanted. I added the pearls, that helped.

It's very hard to tell, but the bottom of the card is actually showing the underneath layer. The front of the card is trimmed and the bottom layer is showing in the front. That's where the buttons are. I LOVE the buttons. They really added a special touch. That orange stuff on the brown button is really interesting, I separated some multi colored yarn I have and used just the orange fluffy part...FUN!!!  I don't seem to use buttons too often, but I really like to see them on cards and enjoy them when I remember that I have a nice stash.

Challenges:  Just for Fun: orange (polka dot ribbon and butterflies) olive (flourish) & brown
                     (stamp on card front and frame
                   EBTKS: Buttons

Thank you for looking,
Be blessed,
e